OpenJump is a Java Based, Cross-Platform open source GIS analysis and query tool. We've been using it a lot lately, and I would say out of all the open source tools (and even compared to many commercial tools) for geospatial analysis, it is one of the best out there.
While it is fairly rich in functionality in terms of doing statistical analysis on ESRI shapefile as well as PostGIS and other formats and also has numerous geometry manipulation features and plugins in its tool belt, we like the ad-hoc query ability the most. The ease and simplicity of that one tool makes it stand out from the pack. People not comfortable with SQL may not appreciate that feature as much as we do though.
In this excerpt we will quickly go thru the history of project and the ties between the PostGIS group and OpenJump group, how to install, setup a connection to a PostGIS enabled PostgreSQL database and doing some ad-hoc queries.
Quick History Lesson
- OpenJump is descended from Java Unified Mapping Platform - JUMP which was incubated by Vivid Solutions.
- OpenJump and the whole JUMP family tree have Java Topology Suite (JTS) as a core foundation of their functionality.
- GEOS which is a core foundation of PostGIS functionality and numerous other projects, is a C++ port of JTS. New Enhancements often are created in JTS and ported to GEOS and a large body of GEOS work has been incubated by Refractions Research, the PostGIS incubation company.
- For more gory details about how all these things are intertwined, check out Martin Davis' recount of the history of GEOS and JTS.
Installing
- Install JRE 1.5 or above if you don't have it already.
- You can then choose either the stable release version from http://sourceforge.net/project/showfiles.php?group_id=118054 or go with a nightly snapshot build. We tend to go with the nightly snapshot since there have been a lot of speed enhancements made that are not in the current production release.
- For snapshot releases, no install is necessary - you can simply extract the zip and launch the openjump.bat (for Windows) or openjump.sh for Linux/Unix based to launch the program. The production release includes an installer for windows.
- Note - OpenJump uses a Plug-In architecture. For our particular exercises, you won't need any plug-ins not in Core. Many plugins are not included in the core, so to get those download them from http://sourceforge.net/project/showfiles.php?group_id=118054. Details on how to install plugins is http://openjump.org/wiki/show/Installing+PlugIns Installing PlugIns
- For those who don't know anything about PostGIS and have no clue how to load spatial data into PostgreSQL, please check out our Almost Idiot's Guide to PostGIS that demonstrates quickly installing and loading using Mass Town data as an example. Also check out our pgsql2shp and shp2pgsql cheat sheet for dumping and loading spatial data from PostgreSQL.
Connecting to a PostGIS enabled PostgreSQL database
- Launch the bin/openjump.bat (for windows), bin/openjump.sh (for Linux)
- On Menu go to Layer->Run Datastore Query -- your screen should look something like this
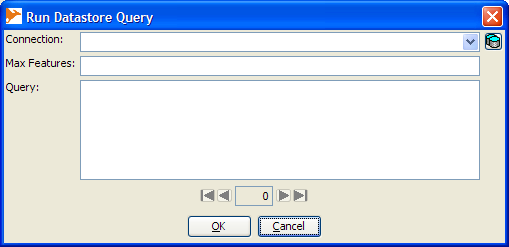
- Next click the little database icon to the right of the connection drop down
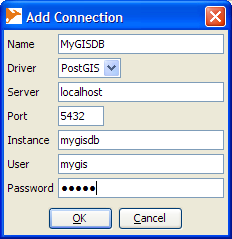
- Click "Add"
- Fill in connection info and then click okay
- Name field can have any name you want to give the connection
- Driver PostGIS
- Server - the hostname of the PostgreSQL Server
- Port 5432 (or if you have a non-standard port whatever that is)
- Instance This is the name of the database you want to connect to.
- User, Password - The username and password of the PostgreSQL user you want to connect as.
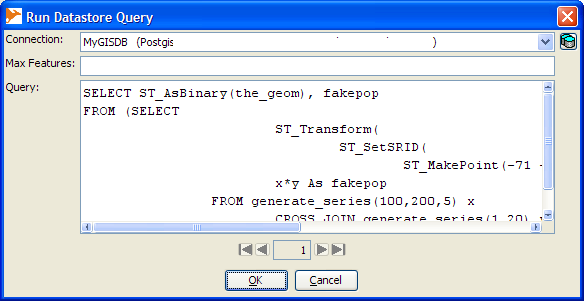
When you are done, your screen should look something like this.

Writing spatial queries and viewing them
Now we shall create a very trivial query that magically needs no real data. Simply select the connection you just made, and in the query box type the following. Keep in mind for Ad-hoc, open jump requires the format to be in Well-Known Binary (WKB), so force the geometry to WKB with ST_AsBinary():
SELECT ST_AsBinary(the_geom), fakepop
FROM (SELECT
            ST_Transform(
                ST_SetSRID(
                    ST_MakePoint(-71 + x*random()*0.01,42 + y*0.1*random()),4326),2163) As the_geom,
            x*y As fakepop
        FROM generate_series(100,200,5) x
            CROSS JOIN generate_series(1,20) y
        ) As foo;
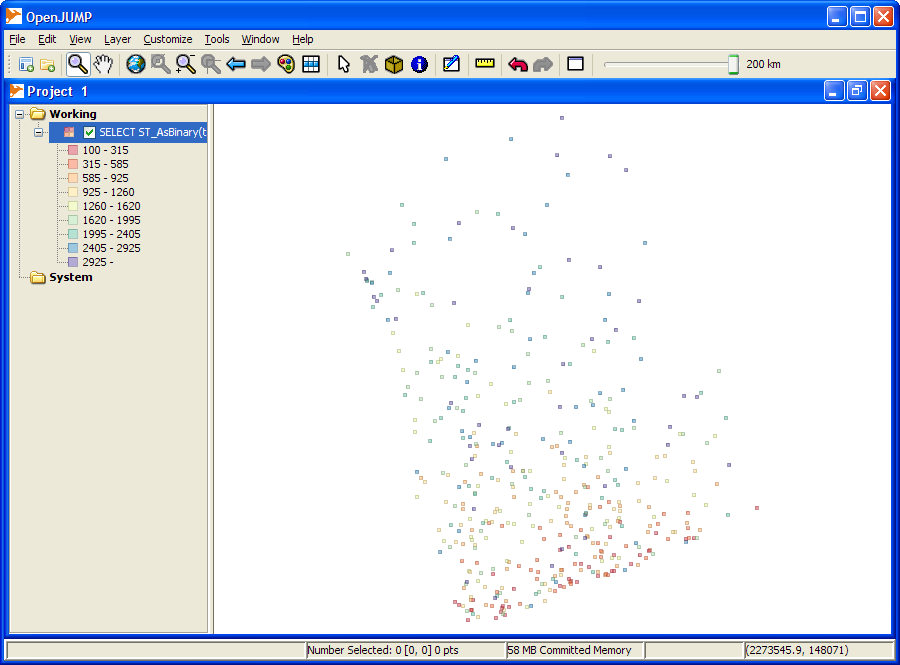
Click okay and when you are done, you should have a breath-taking map that looks something like this and will change each time you run the query:
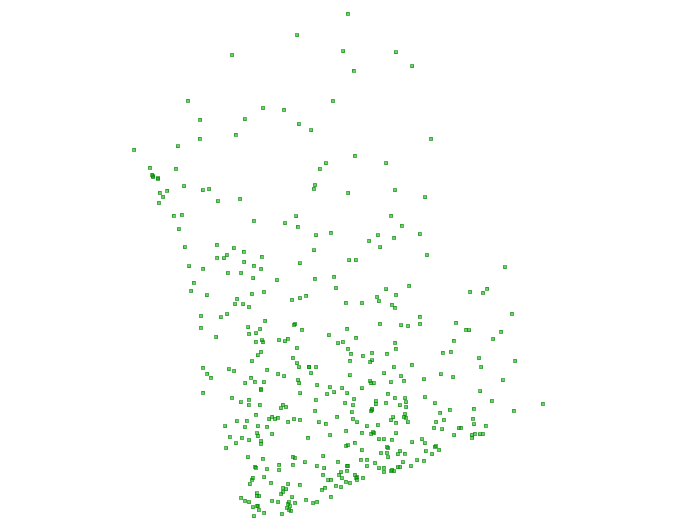
NOTE: There are options on the file menu that will allow you to save the view as PNG, JPG or SVG.
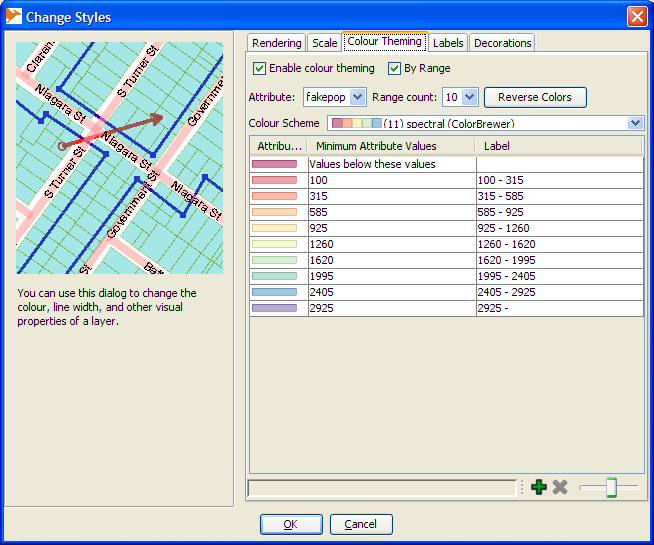
Now if we want to change the colors of the points based on our fakepop, we do this.
- Select the Layer
- Right mouse-click and select Change Styles
- Switch to Color Theming tab and click to Enable Color Theming and also by Range.
Your screen should look something like this:
And the result of your hard work should look something like this